
Sharpening Scissors the Right Way
“How to Sharpen Scissors” Video at End of Post
We all have them. We all tolerate them. That old pair of scissors that are so dull they bend the paper and need sharpening. In the garden, dull garden scissors or snips can leave wounds that can risk the health of your prize plants. If you knew how easy it was to sharpen them, you’d kick yourself. So let’s take a quick peek and the steps to sharpen scissors, and get them a sharp cutting edge. Fortunately, this technique can be used over and over to sharpen not only all your scissors, but you can sharpen garden snips, secateurs, loppers, and all your other dual blade tools with nearly the same sharpening technique.
What You’ll need:
- Diamond Sharpening Stones (I like Diamond Paddles)
- Water or Honing Oil
- A rag
- Paper for sharpened cut testing
- A screwdriver (If your scissors have a screw)
- A permanent marker (optional)
So, there are a ton of options for actual scissor sharpening when it comes to tools. But I like simple, and diamond stone sharpening paddles are my favorite. They come in a set of 3 usually, coarse, medium and fine, and can be used not only to sharpen your scissors, but other tools in your garden shed or shop. And they are relatively cheap and take up minimal space. You can also throw them in your pocket, or garden apron, for access out in the wild.
You can use these diamond stone scissor sharpeners dry or wet, and the debate is out on which is better, but i like to use just a little water on the stone, and it seems to help sharpen and keep the stone clean as steel comes off the blade.
Scissor Sharpening Steps: The “How to Sharpen Scissors” Checklist
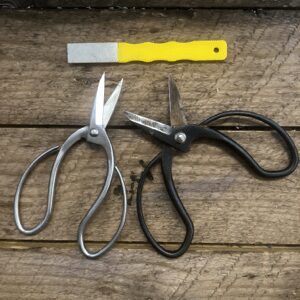
Prep and Disassemble Your Scissors to Put on an Edge
If your scissors have a screw, taking them apart during the sharpening processes can be quite helpful, and you can get access to the full blade. If not you will have to open them fully to get the blades.
Sharpening the scissor blades is a two step process, and it’s important to do both sides of each scissor blade during sharpening.


Take the permanent marker and run it along the front blade of the scissor. This will give you a reference and make sure you have sharpened the entire blade of the scissors. You can use the ink as a guide to show areas of the blade that have been left unsharpened.
Sharpen the Blades
I start with the back of the scissor blade, or the flat side. The goal here is to remove any burs (very fine), get rid of any rust that has accumulated, and make the edge totally flat. Put the scissors on the edge of a table or bench and run the stone over the scissor blade in a flat, sweeping motion. If should just need a few swipes with the fine paddle, but if there is rust or divots you may need to use the coarse paddle to remove more material. Once you have shiny metal on the blades edge, clean up with your towel and flip to the other side.


Now, let’s talk about how scissors work. They actually shear whatever you are cutting between the contact point, so the angle is very abrupt at the tup of the blade. As we sharpen the scissor blade edge, it will only be about 10 degrees off perpendicular to the bevel side. This seems counter intuitive, and most folks try and sharpen at the bevel angle. You can put the scissor blade in a vise, or hold it securely in your hand, and run the paddle from inside out across the blades edge. A few passes should put a shiny edge on your blades.


Test Your Sharpening Work
Try and cut the paper. A fine blade should cut with out effort, and you should be able to “push” the open blade across the paper, cutting with ease. If you can’t, rinse and repeat.
Sharpening Scissors Video Guide
If you are like me, a quick video is my best learning tool. See our “Sharpening Scissors” video for a simple, short guide to teach you how to sharpen just about anything with diamond sharpening paddles.
Ready to Hone your Scissors?
So that’s it, plain and simple. If you are like me, you will go on a sharpening binge and sharpen all the scissors in your house garage and even your neighbor’s. Check out our video library that show sharpening techniques for scissors, pruners, mower blades and more.


Unique Garden Tools

Shop Our Gardening Gift Boxes

5 Star Reviews for Our Hori Hori


You must be logged in to post a comment.