Cleaning out the fridge can provide your next harvest
Have you ever looked at a sprouting potato or a leftover garlic clove and wondered if it could be planted? The answer is yes! In fact, your kitchen is full of free plants just waiting to grow. Turning grocery store food scraps into a productive garden is one of the easiest, most rewarding, and most budget-friendly gardening hacks out there.
This guide will show you how to start a thriving vegetable garden from kitchen scraps, helping you save money on groceries and reduce food waste.
Here are 7 common kitchen scraps you can plant today.
Master Gardener Tips for Kitchen Scrap Gardening
Before we get started, a quick tip to set you up for success. While kitchen scrap gardening is simple, a few expert tips can dramatically increase your success. Master Gardeners, who are trained by university extension programs to provide research-based horticultural advice, recommend the following for a more productive harvest-
- Mind Your Soil– Kitchen scraps planted directly in nutrient-poor soil may struggle. For a robust start, use a high-quality potting mix or amend your garden soil with compost before planting.
- The Power of the Sun– Ensure your regrown plants get adequate sunlight. Most vegetable scraps need at least 6-8 hours of direct sunlight per day to thrive and produce new food.
- Water Wisely– The goal is moist, not waterlogged, soil. Overwatering is a common mistake that can cause roots to rot. The soil should feel like a wrung-out sponge—damp but not dripping.
- Start Small– Master Gardeners recommend starting with a few plants you know will succeed, like potatoes or celery, to build your confidence. You can always expand your garden later!
1. Potato – The Sprouting Scrubber
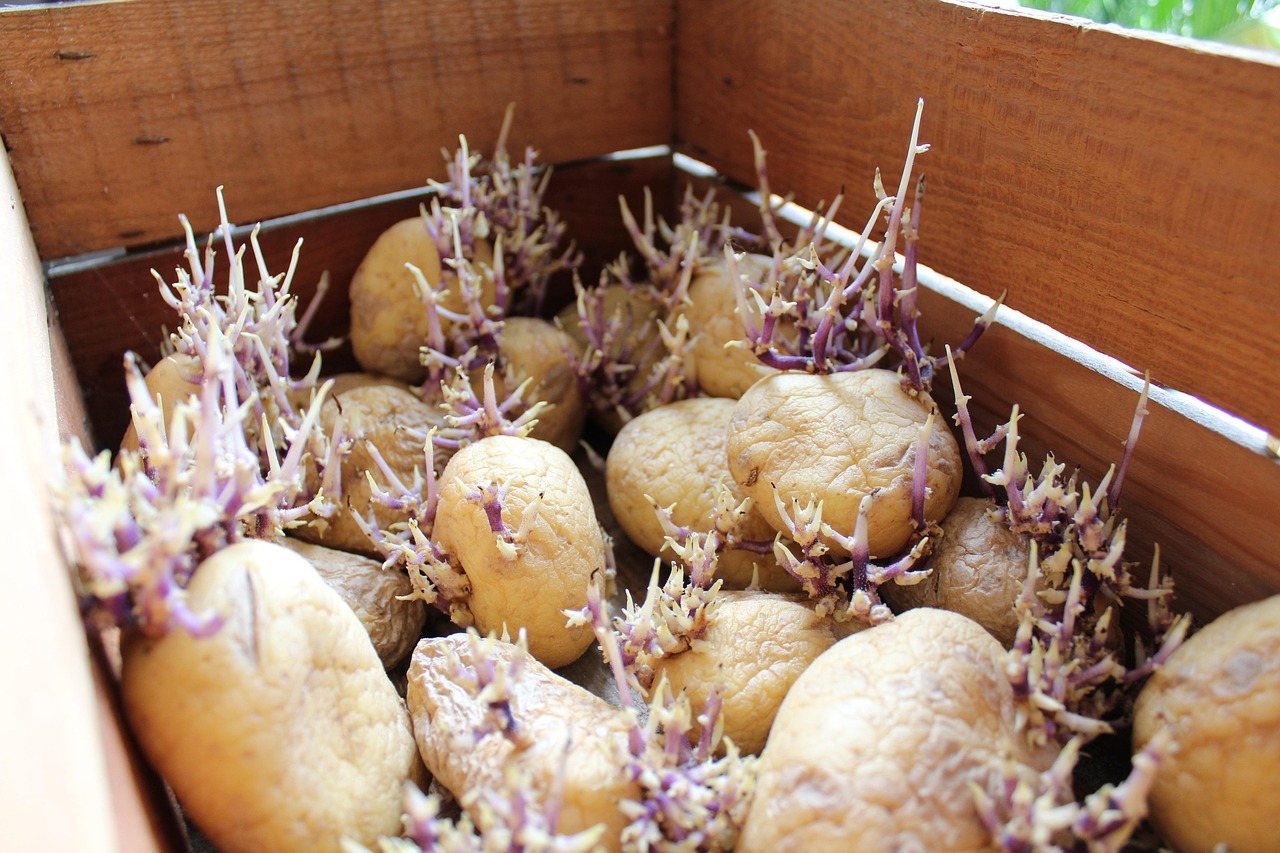
Those sprouts on an old potato are called “eyes,” and they’re the key to growing a new plant. This is a classic for a reason- it’s simple and effective.
- How to Plant Sprouting Potatoes– Cut the potato into chunks using a gardener’s knife, making sure each piece has at least one or two eyes. Let the pieces dry on the counter for a day. Plant them about 4-6 inches deep in loose, well-dr.aining soil.
- Harvesting Tips– Wait until the plant’s leaves turn yellow and die back. Gently dig up the new potatoes in late summer.
2. Garlic – The Leftover Clove
A single clove of garlic can produce a whole new garlic bulb. Don’t toss those old cloves with a green shoot!
- How to Plant Garlic– Break the bulb apart and plant each individual clove with the flat, root end down, about 2 inches deep in the soil.
- Harvesting Tips– You can harvest the delicious green stalks, known as garlic scapes, in the spring. Once the main stalk yellows and dies, your new bulbs are ready to be dug up.
3. Onion – The Green Shooter
A sprouting onion won’t grow into another perfect round onion, but it will give you a continuous supply of fresh, mild scallions.
- How to Plant Sprouting Onions– Plant the entire sprouting onion bulb directly into a pot or the ground, with the green tip just peeking out of the soil.
- Harvesting Tips– Simply snip off the greens as you need them. The plant will keep producing new stalks.
4. Ginger – The Tropical Root
That shriveled piece of ginger is a tropical plant waiting to be revived. As long as it isn’t moldy, it can be planted to grow more ginger.
- How to Plant Ginger– Cut the root into pieces with at least one “eye” or bud on each. Plant them about 2 inches deep in a pot of rich, well-dr.aining soil. Keep the pot in a warm, humid spot.
- Harvesting Tips– Wait about 8-10 months for the underground rhizomes to grow large enough for a good harvest.
5. Celery – The Water-Rooted Wonder
You can get fresh celery by regrowing the leftover stalk base. This is a great, low-effort project for beginners.
- How to Plant Celery Scraps– Cut off the bottom 2 inches of the celery stalk. Place it in a shallow bowl of water on a sunny windowsill.
- Harvesting Tips– Once roots have formed, you can plant the entire base in a pot with soil. It will continue to produce new stalks.
6. Romaine Lettuce – The Head Start
Similar to celery, the hard white base of a head of romaine can be regrown into a fresh, leafy plant.
- How to Plant Romaine Scraps– Place the bottom 2 inches of the romaine head in a shallow bowl of water. Change the water every few days.
- Harvesting Tips– Once new leaves start to appear, plant the base in soil for a continuous supply of fresh lettuce leaves.
7. Tomato – The Seedy Savior
Don’t toss those overripe tomatoes! Their seeds are perfect for growing new tomato plants. This is an excellent way to save seeds from your favorite heirloom varieties.
- How to Plant Tomato Seeds– Simply slice the tomato and bury it a few inches deep in the soil. Multiple seedlings will sprout from the same spot.
- Harvesting Tips– Once the seedlings are a few inches tall, thin them out or transplant them to give each plant enough space to grow.
Now that you know the secrets to growing a thriving garden from your kitchen scraps, you can start today. It’s an easy and rewarding way to connect with your food, save money, and reduce waste, all while discovering the simple joy of watching something grow. So next time you’re about to toss a sprouting vegetable, remember you’re holding the potential for a new harvest.


More From Our Master Gardener


Unique Garden Tools

Shop Our Gardening Gift Boxes

5 Star Reviews for Our Hori Hori