
A Superior Approach to Indoor Watering & Seed Starting in Trays
Welcome back, fellow green thumbs! Today, we’re diving into the world of effective watering and seed starting, a crucial requirement for gardeners who are eager to jump-start their growing season. One technique that’s gaining traction among horticulturists and hobbyists alike is bottom watering. Let’s explore why this method is becoming a go-to for many gardeners.
What is Bottom Watering?
Bottom watering is a simple yet effective way of hydrating plants. Instead of watering from the top, you fill a tray with water and place your seed trays or pots in it. The soil absorbs the moisture from the bottom up, ensuring that the water reaches the roots directly. This method is particularly beneficial when starting seeds in trays.
For Plant Geeks Only – The Science
The science behind bottom watering is rooted (pun intended 🙂 ) in the principles of capillary action and gravity. Capillary action is a physical process where liquid moves up through a narrow space, defying gravity, due to the forces of adhesion, cohesion, and surface tension. In the context of bottom watering, when a plant’s pot is placed in a tray of water, the porous nature of the soil allows water to be drawn upwards through tiny gaps between soil particles. This upward movement ensures an even distribution of moisture throughout the soil, reaching the entire root system.
Unlike top watering, which can lead to uneven soil moisture and potential waterlogging, bottom watering encourages a more natural and efficient absorption of water. This method mimics the way plants naturally absorb water in their habitat, with roots reaching down into the soil towards moisture sources. Additionally, it fosters deeper root growth as roots tend to grow towards the water source, resulting in a more robust and resilient plant. This approach to watering is particularly advantageous for delicate seedlings and indoor plants, as it minimizes disturbance to the soil and roots, reduces the risk of fungal diseases, and prevents salt buildup on the soil surface.
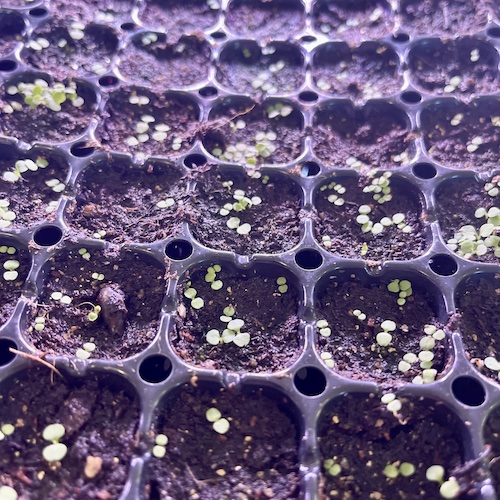
Master Gardener Tip – bottom watering is a must for tiny tiny seeds, like snapdragons and foxglove. If you don’t use bottom watering your seeds will float to the lowest point in your tray and grow in a big clump. Watering from the low to high point source this problem and prevents algae growth.
The Benefits of Bottom Watering for Seed Starting
1. Promotes Strong Root Growth– The nature of bottom watering encourages roots to grow downwards in search of water, leading to a stronger, more extensive root system. This is essential for the overall health and stability of the plant as it matures.
2. Minimizes the Risk of Disease and Fungus– Watering from the top can leave foliage damp, which is a breeding ground for fungal diseases like damping-off. Bottom watering keeps the leaves dry, significantly reducing the risk of these issues.
3. Conserves Water– This method can be more water-efficient. Water added to the top of soil can evaporate or run off without being absorbed. With bottom watering, the soil takes up just the amount of water it needs, reducing waste.
4. Even Moisture Distribution– When you water from the top, it’s common for the water to channel through the soil, leaving dry spots. Bottom watering ensures an even distribution of moisture throughout the potting mix.
5. Less Disturbance to Seeds and Seedlings– Direct watering can displace or unearth seeds and delicate seedlings. Bottom watering is a gentler approach, keeping everything intact and undisturbed.
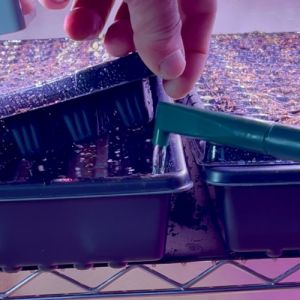
How to Bottom Water Your Seed Trays
- Prepare Your Trays– Start with your seed trays filled with a quality seed starting mix. Plant your seeds according to the package instructions.
- Choose the Right Container– Use a tray or container that’s larger and slightly deeper than your seed trays. This will be your watering tray.
- Add Water: Fill the watering tray with water. The level should be about 1/4 to 1/2 inch deep. You don’t want to submerge the seed trays completely.
- Let the Soil Absorb the Water– Place your seed trays in the watering tray. Leave them there until you see that the topsoil is moist. This usually takes about 10 to 30 minutes, depending on the soil dryness.
- Drain Excess Water– Once the soil is moist, remove the seed trays and let any excess water drain away. Avoid letting your seed trays sit in water for extended periods to prevent root rot.
Advantages for Container and Indoor Plants
- Deep Watering Encourages Deep Root Growth – Plants in containers and indoors often suffer from shallow root systems. Bottom watering encourages roots to grow deeper, promoting healthier plants.
- Prevents Soil Erosion and Nutrient Runoff – Top watering can wash away the top layer of soil, along with essential nutrients. Bottom watering ensures the soil structure and nutrients remain intact.
- Minimizes Salt Build-Up – Regular top watering can lead to salt accumulation on the soil surface, which can harm plant health. Bottom watering helps to prevent this build-up.
Conclusion
Bottom watering is a pro technique for starting seeds in trays, or providing water to indoor and container plants. It promotes healthy root growth, conserves water, and minimizes disease risk. It’s a small change in your watering routine that can yield significant benefits for your seedlings.
As always, happy gardening! Stay tuned for more tips and tricks to make your garden flourish. Let’s get those green thumbs working!
Bottom Watering FAQ
- What is bottom watering? Bottom watering is a method where plants are watered from the bottom rather than from the top. This involves placing the plant container in a tray of water and allowing the soil to absorb moisture upwards through capillary action.
- Why use bottom watering? Bottom watering promotes even moisture distribution, encourages deep root growth, reduces the risk of fungal diseases, prevents soil erosion and nutrient runoff, and minimizes salt build-up on the soil surface.
- How do I bottom water my plants? Place your plant containers in a tray filled with water. Ensure the water level is not too high to avoid flooding. Allow the soil to absorb water for about 30 minutes to an hour, then remove the plants and let them drain excess water.
- Can all plants be bottom watered? Most plants can benefit from bottom watering, especially those susceptible to root rot or fungal diseases. However, some plants prefer dry conditions and might not be suitable for this method. Always research the specific watering needs of your plants.
- How often should I bottom water my plants? The frequency of bottom watering depends on the plant type, size, and environmental conditions. Monitor the soil moisture and water when the top inch of the soil feels dry.
- How long should I leave my plants in the water? Typically, 30 minutes to an hour is sufficient. However, this can vary depending on the size of the pot and the dryness of the soil. Check the moisture level of the topsoil to determine if your plants have absorbed enough water.
- Can bottom watering lead to overwatering? While bottom watering reduces the risk of overwatering, it is still possible if plants are left in water for too long or watered too frequently. Always check the soil moisture level before watering again.
- Is bottom watering better than top watering? Both methods have their advantages. Bottom watering is excellent for even moisture distribution and avoiding diseases, but top watering can sometimes be necessary to flush out salts from the soil.
- Can I use bottom watering for outdoor plants? Yes, bottom watering can be used for outdoor potted plants. However, it might be less practical for large outdoor gardens.
- What type of water should I use for bottom watering? Use room temperature water, preferably rainwater or distilled water, especially for sensitive plants. Tap water can be used but let it sit for a day to dissipate chlorine and adjust to room temperature.


Unique Garden Tools

Shop Our Gardening Gift Boxes

5 Star Reviews for Our Hori Hori


You must be logged in to post a comment.