

Making more lavender with cuttings
Lavender, with its fragrant blooms and easy-to-maintain nature, is a favorite among gardeners. Whether you want to expand your lavender garden or share it with friends, propagating this plant is a rewarding and cost-effective method. In this guide, we’ll delve into the steps to successfully propagate lavender, ensuring a delightful burst of purple in your garden.
Understanding Lavender Propagation
Propagating lavender refers to creating new plants from the one you already have. This can be achieved through seeds, cuttings, or by dividing mature plants. Of these methods, propagating from cuttings is the most popular because it retains the exact characteristics of the parent plant.
Propagation Tools You’ll Need
- Healthy lavender plant
- Sharp pruning shears or scissors
- Rooting hormone powder (optional but recommended)
- Small pots with good drainage
- Potting mix or compost
- Clear plastic bags or a plastic dome
Step-by-Step Guide to Propagating Lavender from Cuttings
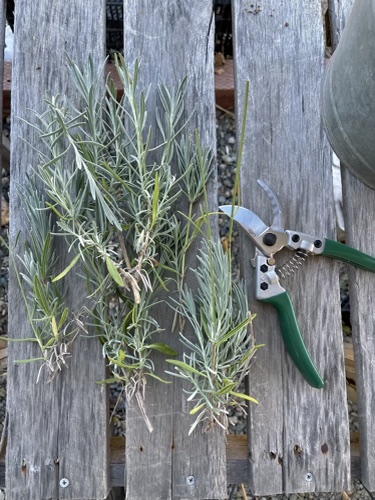
- Choosing the Right Cutting – Early morning is the best time to take cuttings. Choose a non-flowering stem, as they root better than flowering ones. It should be around 4-6 inches long, green, and flexible.
- Preparing the Cutting – Using your shears, make a clean cut below a leaf node. Remove leaves from the bottom two-thirds of the cutting.
- Rooting Hormone – Although optional, dipping the cut end into a rooting hormone powder can enhance the rooting process.
- Planting – Fill a pot with damp potting mix or compost. Make a hole with a pencil or your finger, then insert the cutting, ensuring that the stripped section is beneath the soil. Press down gently.
- Creating a Humid Environment – To encourage rooting, it’s important to maintain humidity. Cover the pot with a clear plastic bag or place it under a plastic dome. This acts like a mini greenhouse.
- Placement – Put the pot in a bright location but out of direct sunlight. Ensure the soil remains moist but not soggy.
- Root Development – In 2-6 weeks, the cuttings should develop roots. You can gently tug at a cutting; if there’s resistance, it means roots have formed.
- Transplanting – Once roots are established, transplant the young lavender plants into larger pots or directly into your garden.
Tips for Success
- Use a well-draining soil to prevent rot.
- Don’t overwater; lavender prefers to be on the drier side.
- Be patient. Some cuttings may take longer than others to root.
- Once established, prune young lavender plants to encourage bushy growth.
Final Thoughts
Propagating lavender is a beautiful journey that transforms a simple cutting into a blooming plant. With a little patience and the right care, you can easily expand your lavender garden and enjoy its serene beauty and soothing fragrance for years to come. Note: Below is our video overview if you are a visual person ;).
If you found this guide on “Propagating Lavender” helpful, share it with your fellow gardeners, and let us know your propagation success stories!


Unique Garden Tools

Shop Our Gardening Gift Boxes

5 Star Reviews for Our Hori Hori

Recent Posts


The Advantages of Built-Up Garden Beds: A Gardener’s Best Friend

The Secret Weapon for Lush Blooms: How to Create the Perfect Fertilizer Schedule

Create a Stunning Cottage Garden with These Easy-to-Grow Flowers

Fastest Growing Trees: Transform Your Landscape Quickly

What to Plant in July: A Comprehensive Guide for Gardeners


You must be logged in to post a comment.