

How to get a head start on Spring
Introduction
Embark on an exciting journey of starting seeds indoors, a pivotal step towards cultivating a vibrant and flourishing garden. This comprehensive guide will provide you with all the necessary steps, insightful tips, and practical tricks to ensure your seedlings grow into robust, healthy plants. Now this guide goes into great detail on how to start seeds and grow them indoors before the spring season, but I understand that you can have a seed tray I window that faces south to start seeds, or have a complex operation with grow lights in the irrigation set up. Either will work and you can start simple and grow.
Why Start Seeds Indoors?
Starting seeds indoors is a fantastic way to get a head start on the gardening season. Restart any of our difficult to grow plants indoors to get a jumpstart and control the quality of our flowers. Things like foxglove, Lisianthus and snapdragons, our best started indoors to ensure quality and a great start. By beginning your planting process indoors, you give your plants a better chance of thriving, as they can grow in a controlled environment, safe from the unpredictable weather and pests found outdoors. This method allows for an earlier harvest and gives you the opportunity to grow different varieties that might need a longer growing season than your local climate provides.
1. Choosing the Right Seeds Selecting the right seeds is crucial for indoor seed starting. Focus on varieties that are particularly suited for indoor germination, such as tomatoes, peppers, and lettuce. It’s important to source high-quality, organic seeds from trustworthy suppliers to increase your chances of successful germination.
- Select Seeds Ideal for Indoor Starting Prioritize seeds that are known to benefit from an early start indoors, such as tomatoes, peppers, eggplants, and various herbs. These typically require a longer growing season and will benefit from the head start.
- Ensure Seed Quality for Indoor Growth Choose high-quality, organic, or non-GMO seeds from reliable suppliers. Good quality seeds are more likely to thrive in the controlled environment of indoor starting.
- Assess Seed Freshness and Germination Rate Look for seeds with recent packaging dates. Fresh seeds have higher germination rates, which is crucial for indoor seed starting where each pot or cell is valuable.
- Check Seed Packet Information for Indoor Suitability Read seed packets for specific advice on indoor starting. They often include valuable information on whether the variety is suitable for indoor germination and any special care instructions.
- Consider Size and Growth Habit Choose plant varieties that will manage well in the space you have. Compact or dwarf varieties often work better indoors and in small outdoor spaces like balconies.
- Research Light and Temperature Requirements Understand the light and temperature needs for each type of seed. While most seedlings prefer warm temperatures, some might require cooler conditions to germinate.
- Factor in Time to Transplant Consider the time it takes from sowing seeds indoors to transplanting them outdoors. Make sure you can provide the necessary conditions throughout this period.
- Look for Disease-Resistant Varieties Indoor plants can be prone to specific diseases due to limited air circulation. Choose varieties with known resistance to common indoor plant diseases.
- Plan for Continuous Harvest If you wish to have a steady supply of produce, select varieties that can be sown in intervals and consider their individual growth rates and harvest times.
- Experiment with Exotic or Specialty Varieties Indoor seed starting can be an opportunity to grow exotic or specialty plants that are not typically found in local nurseries, adding an interesting element to your garden.
By focusing on these aspects, you can effectively choose seeds that are most likely to succeed when started indoors, leading to a healthier and more productive indoor garden.
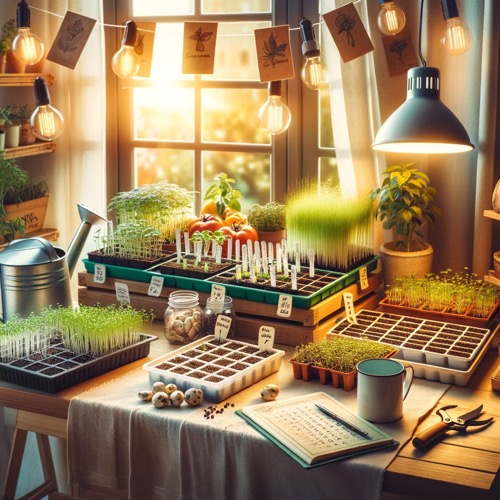
2. Gathering Supplies The right supplies are the foundation of successful seed starting. This includes choosing appropriate containers like seed trays, peat pots, or even repurposed egg cartons, and using a special soil mix that’s lightweight and rich in nutrients. Proper lighting is also essential, so if you don’t have a sunny window, consider investing in grow lights.
Starting seeds indoors requires a set of specific tools and materials to ensure successful germination and growth. Here’s a comprehensive list of things you’ll need:
- Seed Trays or Containers: You can use specially designed seed trays, peat pots, small pots, or even repurposed containers like egg cartons or yogurt cups. Make sure they have drainage holes.
- Seed Starting Mix: A lightweight, sterile seed starting mix is preferable as it promotes better root growth and reduces the risk of disease.
- Seeds: Choose high-quality seeds of plants that are suitable for indoor starting. Consider vegetables, herbs, and flowers that have a longer growing season or that benefit from a head start.
- Watering Can or Spray Bottle: For gentle watering that won’t disturb the seeds or young seedlings. A spray bottle can help keep the soil moist without overwatering.
- Grow Lights: If you don’t have a sunny south-facing window, grow lights are essential to provide enough light for your seedlings.
- Heat Mats: These mats gently warm the soil, which can improve germination rates, especially for warmth-loving plants.
- Humidity Domes or Plastic Wrap: Covering the trays with a humidity dome or plastic wrap can help maintain moisture levels and warmth, important for seed germination.
- Labels or Markers: Label your trays or pots with the plant name and sowing date to keep track of what you’ve planted and when.
- Timer for Lights: If using grow lights, a timer ensures that your seedlings receive a consistent amount of light each day.
- Thermometer: A simple way to monitor the temperature of your growing area, especially if you are using heat mats.
- Fertilizer: Once seedlings have their first set of true leaves, they’ll benefit from a diluted, balanced fertilizer.
- Pruning Scissors or Shears: For thinning and pruning seedlings as needed.
- Gloves: Gardening gloves can help when handling soil and transplanting seedlings.
- Watering Tray: To place underneath your seed trays or pots to catch excess water.
Having these items on hand will greatly enhance your seed starting experience, helping to ensure healthy, robust plants ready for transplanting to your garden.
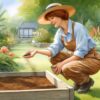
3. Planting Your Seeds Planting your seeds correctly is key to their growth. Start by preparing your soil mix, ensuring it’s moist but not overly wet. Pay attention to the planting depth recommended on the seed packet, as this varies across different plant types. Adequate space is also vital for each seed to reduce competition and promote healthy growth.
4. Creating the Ideal Environment Creating an environment conducive to seed growth involves maintaining a consistent temperature, ideally between 65-75°F (18-24°C), and ensuring adequate humidity. Once your seedlings emerge, they will require gentle air circulation to strengthen their stems and prevent disease.
5. Watering and Feeding Watering your seedlings correctly is critical. The soil should be kept consistently moist but not waterlogged to prevent root rot. As the seedlings grow and develop their second set of true leaves, they will benefit from a balanced, diluted fertilizer to support their growth.
6. Transplanting to Your Garden The final step in the indoor seed starting process is transplanting your seedlings to the garden. This involves a process called hardening off, where seedlings are gradually acclimatized to outdoor conditions. Transplanting should be done carefully, preferably on a cloudy day to reduce shock.
Conclusion
Starting seeds indoors is a fulfilling and strategic approach to gardening. By following the guidance provided in this guide, gardeners of all skill levels can enjoy the rewards of a bountiful and beautiful garden.


Shop our Seed Tools

Unique Garden Tools

Shop Our Gardening Gift Boxes

5 Star Reviews for Our Hori Hori


Shop Our Hardwood Dibblers

You must be logged in to post a comment.