
Introduction – Sow the Seeds of Green Dreams
Embark on an enchanting journey into the world of seed starting, where the simple act of planting a seed unlocks the magic of nature. This process turns tiny, dormant seeds into lush, vibrant gardens, offering a rewarding experience that connects you with the cycle of life.
Unleash the Magic of Seed Starting – There’s something truly magical about watching a seed sprout and grow. It’s a process that can ignite a lifelong passion for gardening and deepen your appreciation for nature.
Why Start from Seed? – Seed starting has numerous benefits. It is cost-effective, allows access to a diverse range of plants, and brings the joy of watching a plant grow from a tiny seed into a full-grown plant. You can choose from an array of vegetables, herbs, and flowers that aren’t usually available as seedlings in local nurseries.
Is Seed Starting Right for You? – While seed starting is incredibly rewarding, it requires patience and care. It’s perfect for those who enjoy watching the gradual progress of their plants. However, for those with limited time or space, alternatives such as buying seedlings or direct sowing in the garden are viable options.
Planning Your Seed Starting Adventure
When to Start – Understanding the right time to start seeds is crucial. It largely depends on your local climate and the specific needs of the plants you wish to grow. Many seeds need to be started indoors several weeks before the last frost date of your area. We’ll help you create a tailored planting calendar.
Gather Your Supplies – To begin, you’ll need some basic supplies: seed trays or small pots, high-quality seed starting mix, a watering can with a gentle spray, and possibly a heat mat and grow lights if your growing area lacks adequate warmth and sunlight.


Choosing the Perfect Seeds – Selecting the right seeds is a critical step. Consider what plants you want to grow, keeping in mind factors like the growing conditions in your area, the space you have available, and the age and viability of the seeds.
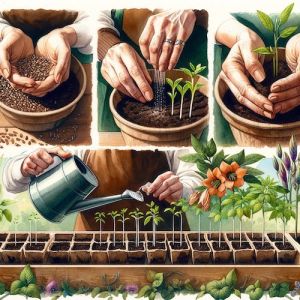
From Seed to Sprout – The Nurturing Process
Preparing the Seed Trays – Start by filling your trays or pots with a moistened seed starting mix. Make sure the containers have adequate drainage to prevent waterlogging.
Sowing the Seeds – Plant your seeds at the right depth, which varies depending on the seed size. Generally, larger seeds are planted deeper. Ensure proper spacing to give each seedling room to grow.
Light Up Their Lives – Seedlings need plenty of light to grow strong and healthy. If natural light is insufficient, consider using grow lights. The right amount of light helps prevent weak, leggy seedlings.
Keeping it Warm and Cozy – Temperature plays a significant role in seed germination. Most seeds require a warm environment to sprout. A heat mat can help maintain a consistent temperature, especially in cooler climates.
Watering Wisdom – Watering is a delicate balance. The soil should be kept consistently moist but not soggy. Overwatering can lead to fungal diseases like damping off.


Seedling Success – Tending to Tiny Triumphs
Thinning the Ranks – As seedlings grow, they may need to be thinned to ensure adequate space for healthy development. This involves gently removing some seedlings to prevent overcrowding.
Hardening Off – Gradually acclimatize your seedlings to outdoor conditions. This process involves exposing them to the elements progressively, preparing them for eventual planting in the garden.
Transplanting Treasures – When seedlings are strong enough, they can be transplanted into larger pots or your garden. This step involves careful handling to avoid damaging the delicate roots and stems.
Celebrate Sprouting Joy – Reap the Rewards
Harvesting Homegrown Goodness – The ultimate reward of seed starting is harvesting your own produce. Learn to identify the right time to harvest different vegetables and flowers for optimum flavor and bloom.
Beyond the Basics – As you become more experienced, you can explore advanced techniques like grafting, stratification, or starting challenging plant varieties.
Seeds of Inspiration – Keep expanding your gardening knowledge. Join gardening communities, read blogs, and participate in forums to share experiences and learn from fellow garden enthusiasts.
Some Bonus Sections
Seed Starting Supply List
To ensure a smooth and successful seed starting experience, here’s an updated and streamlined list of essential supplies:
- Seed Trays or Starter Pots – Choose from plastic trays, peat pots, or biodegradable options for sowing seeds.
- Seed Starting Mix – Opt for a lightweight, nutrient-rich mix designed specifically for seed germination.
- Seeds – Select a range of seeds suitable for your climate, including vegetables, herbs, and flowers.
- Watering Can with Fine Rose or Spray Bottle – A gentle watering method is crucial for young seedlings.
- Heat Mat (Optional) – Useful for encouraging germination in warm-weather crops or cooler environments.
- Grow Lights (Optional) – Essential if you don’t have access to a sunny window, to provide the necessary light spectrum.
- Thermometer and Humidity Gauge – To monitor the environmental conditions around your seedlings.
- Plant Labels and Marker – For keeping track of seed types and planting dates.
- Timer for Lights (If Using Grow Lights) – Automates light cycles for consistent exposure.
- Plastic Dome or Cover – Helps in maintaining humidity and warmth, especially crucial in the early growth stages.
- Dibber or Small Stick – Useful for making precise holes for the seeds.
- Small Trowel or Scoop – For handling the seed starting mix.
- Gardening Gloves – Keeps your hands clean and protected.
- Misting Bottle – For gently watering seedlings.
- Mild Liquid Fertilizer – To nourish seedlings once they develop true leaves.
- Seedling Trays with Drainage – Prevents waterlogging by allowing excess water to drain.
- Ventilation Fan (Optional) – Helps circulate air and strengthens seedling stems while reducing fungal disease risks.
This list is tailored to eliminate redundancies and ensure you have all the necessary items for a successful seed starting adventure. Remember, while some items like heat mats and grow lights are optional, they can greatly enhance your seed starting experience.
10 Frequently Asked Questions About Seed Starting
- When is the Best Time to Start Seeds Indoors? The optimal time to start seeds indoors varies depending on the plant species and your local climate. Typically, you should start seeds 6-8 weeks before the last expected frost date in your area. Refer to a planting calendar specific to your region for guidance.
- How Deep Should I Plant Seeds? Seed planting depth should be approximately three times the diameter of the seed, but this can vary. It’s essential to check the seed packet for specific instructions, as some seeds require surface sowing.
- Do I Need Special Soil for Seed Starting? Yes, a seed starting mix is recommended. This mix is designed to be light and sterile, providing the ideal environment for seed germination and reducing the risk of disease.
- How Often Should I Water Seedlings? Watering frequency depends on factors like room temperature, humidity, and the moisture level of the soil. Generally, the soil should be kept moist but not waterlogged. This might mean light watering every day or every other day.
- Why are My Seedlings Leggy and Weak? Leggy, weak seedlings are usually a sign of insufficient light. Ensure they receive enough light by placing them near a sunny window or under grow lights for about 14-16 hours daily.
- How Important is Temperature for Seed Germination? Temperature plays a significant role in seed germination. Most seeds require a warm environment to sprout. A consistent temperature, often provided by a heat mat, can improve germination rates.
- Can I Use Seeds from Last Year? Yes, most seeds remain viable for at least a couple of years if stored properly. However, the germination rate may decrease over time. It’s always good to do a germination test on older seeds before planting.
- When Should I Transplant Seedlings Outdoors? Transplant seedlings outdoors after the last frost date and when they have developed several true leaves. It’s crucial to harden off the seedlings first by gradually exposing them to outdoor conditions over a week or two.
- What is ‘Hardening Off’ Seedlings? Hardening off is the process of acclimatizing indoor-grown seedlings to outdoor conditions. It involves gradually exposing them to sunlight, wind, and temperature variations over a period of 7-14 days.
- How Do I Prevent Damping Off? Damping off, a fungal disease affecting seedlings, can be prevented by using a sterile seed starting mix, ensuring good air circulation, and avoiding overwatering. Some gardeners use a light sprinkling of cinnamon, a natural fungicide, on the soil surface.


Shop our Seed Tools

Unique Garden Tools

Shop Our Gardening Gift Boxes

5 Star Reviews for Our Hori Hori

Recent Posts


The Power of Mounding: An Essential Gardening Technique for Healthy Plants

The Ultimate Guide to Philodendron Birkin – Care, Tips, and Benefits

Watering Plants – Indoor Edition

The Advantages of Built-Up Garden Beds: A Gardener’s Best Friend

The Secret Weapon for Lush Blooms: How to Create the Perfect Fertilizer Schedule


Shop Our Hardwood Dibblers

You must be logged in to post a comment.